Wednesday, March 9, 2011

Time to paint

It's time to start painting after you get as many details as you want in the drawing. Now remember that this is a painting so that you can draw and draw and draw til you get a complete pencil sketch of the person but you are going to paint over it anyway so get the basic proportions and features right and everything else is just practise or "fluff" that you are going to lose in the painting process. But if it makes you feel "safer", draw away.

These next two - three blog entries will take you through the painting of the skin on the portrait. When you paint it is important that you do all of the skin in one sitting. For the skin to be blended properly it must be done while the shadows, skin color and highlights are still wet so don't even think of doing this in acrylic and be sure to find plenty of time to work on the skin in a two day session or less (making sure that the paint is still wet as you work). I have never used extenders for this project and don't recommend them because they change the "tooth" of the paint making it too slick to work with but I strongly recommend that you find what works for you. Jane's Perspective says that if it ain't broke don't fix it so if you follow my skin painting directions and see that you can work that way, then don't go out and buy anything unnecessary. But if find that you would like the paint to dry faster or slower, then feel free to head to the art supply store and start reading labels on mediums for your paint.

That said, to begin, the biggest "mistake" or hardest thing for an artist to do in their first portrait is to get enough shadows into the painting. Many of the first portraits a beginning portrait painter does are relatively "flat" looking. And once an artist has gone to such pains to get the features just right it's really scary to add shadows. Sometimes they look like heavy beards or dirt on the face SO to cure that problem the Jane's Perspective way, we'll put the shadows in FIRST.

This is really easy to do but kind of strange looking at first. Try not to let the commissioner of the painting see it at this stage cause it may make their adorable child look like a racoon or worse but trust me, it's gonna make your painting fabulous.
Here's what we do. You already have the photograph in a plastic bag so you won't mess it up as you choose between burnt umber, raw sienna, or a dark brown of your choosing that comes closest to matching the really dark parts of the photo. You can actually paint a dab on the plastic right over the shadow to see how close the color comes to the shadow color. NEVER use black at this point. If you've ever taken one of my classes you know that the first thing I make you do is throw out the black (figuratively speaking) and start mixing colors or using darker browns for shadows. Black is just such a negative color in that it negates every other color, screws the values all up, and/or makes your painting look like it was painted on black velvet. So pick one of your browns, squint your eyes at the photograph and paint all the dark shadow areas that you see. Even if the shadow is more gradual, if you squint your eyes and see it, paint it. You are blocking in the shadows and giving yourself some paint to work with later. Take another look at the original photo from previous blogs and see where I chose to paint the shadows. Looks wierd, huh?
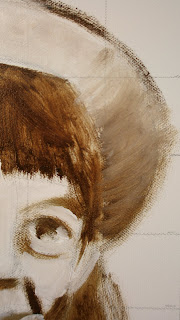
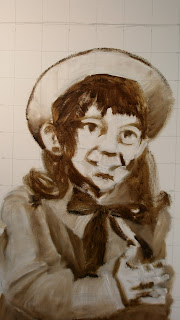
This is all in preparation for the next step which will be to mix the skin color and apply it to the face everywhere except where the shadows or highlights occur. Many times this is right next to the shadows to create that gradual transition from the shadow to the highlight. Here's a sneak preview of that step in the photo below. More on the Jane's Perspective way of painting skin in the next blog. Remember, don't start anything on the skin til you read all about the painting of the skin. I promise I'll get back with you ASAP. Isn't the suspence just killing you? OK, so maybe I don't have much of a life outside my artwork - I, at least, hope you're looking forward to the next step.


Thursday, March 3, 2011

Use all the "tricks"

So why do you need to do all that technical computer stuff when you are working on a fine art painting? Well, let me put it this way. As history discovers more and more about the fine artists of the past we are finding that many of the details of a painting or drawing were done with "tools" of the time. There were boxes (sort of like our enlargers) that projected an image to a canvas for the artist to trace, there were special magnifiers and lights that aided in the exact recreation of a subject, and it's even been speculated that tracings might have been done. Today's modern enlargers, computers, and tricks and tools available to us are our own generation's ways to "shortcut" or aid in an awesome task. For example, this picture shows how you can study the face/head and find divisions that will help you place the eyes, nose, mouth, etc. (You can find guides like this in any beginning drawing book). These divisions are important to know but not necessarily mandatory to know to get started painting a portrait. It's sort of like this. If you know 2 + 2 =4 but your computer says that 2 + 2 =5, then you know something is wrong. The more you know about the divisions of the face, the more you can visualize and correct things about your painting that you might not like or may find "wrong". For instance if the eyes seem too far apart, if you used the measurements of "one eye length equals the distance between the eyes" then you could easily see your error. If you want to know more about these divisions go to LivePerson.com. I'm going to make myself available through them for personalized help on your projects.

So, spend a little time studying the proper divisions of the face and start drawing from scratch, OR if "tools and tricks" were good enough for Michaelangelo, then it's good enough for me - so I say let's use our color copy start with a grid method to enlarge our picture. I always use this grid method even though I well know the proper divisions and can draw the picture free hand because in my case, time is money and accuracy is so important - why sweat the erasures when you can start painting quicker with the grid aiding you in the drawing.

The canvas used for this painting was 18" X 24'. My photo was 8" X 10." If I had used a 16" X 20" canvas you can see where griding both the canvas and the photo would have meant 2" squares on the canvas and 1" squares on the photo to correlate. With the 18" X 24" I was able to center and enlarge the picture by making a row of 1" squares at the top and bottom of the canvas. I filled in rest of the canvas with 2" squares. (Make it easier on yourself for a first time and get a 16" X 20" canvas for an 8" X 10" picture or if you are a better math whiz than me, figure out what will correlate to your photo.) You can even make smaller squares in your grid if you are worried about getting even more details exact in the drawing. (Example, each 1/4" square on your 8"X10" photo can correlate to 1/2" on your 16"X20" canvas) Remember, however that this is a painting so the painting is going to be most important. We are just using some handy tools to aid in the initial sketch on the canvas. It's your call, spend a week drawing or do more of an accurate sketch and proceed to the painting.

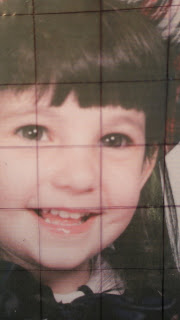
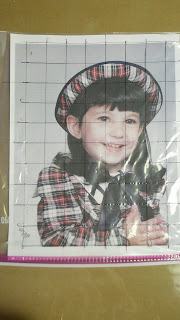
Now, back to why you made the scans and copies. I can put the original photo in a baggie and do the next step BUT remember how important that photo was to your subject or commissioner? If you draw lines over the photo even if they are on the baggie you run the risk of making ridges or dents in the photo SO put the copy in a baggie instead and even if the pen or marker bleeds through it won't matter. If the copy gets ruined you can always print out another. In this photo you can see how I've used a fine point sharpie to measure 1" squares on the color copy.

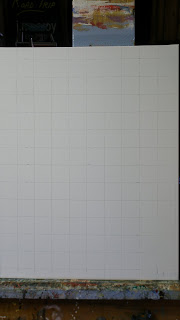
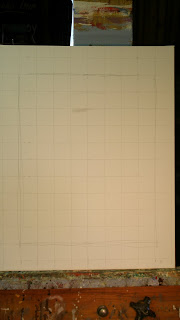
The next trick is to make sure the photo stays in place in the baggie (you can tape it if you need to) as you begin to draw square by square. So here's my canvas with it's grid again.


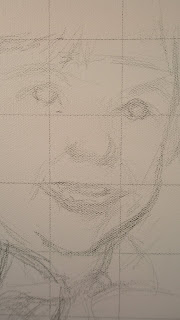
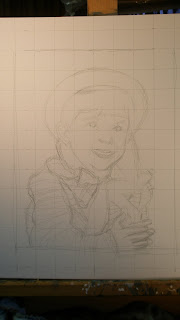
And here's my canvas as I drew the picture square by square.


Compare this enlargement of the drawing of the face to the squares of the face on the photo below it.


So, now I've shown you the importance of that download to print out a color copy that you can "mess up" anyway you need to grid, to handle, or just to enlarge. You've also got the photo in your computer for some other reasons. I'll let you in on those as we go along.


Wednesday, March 2, 2011

I guess you can tell by the dates of my blog that I sorta got busy over the past year. The good thing was that it was all productive (read monetarily) but I've sorely neglected my blog and I really want to show you how to paint a portrait the Jane's Perspective way. All of the steps I will show you are my very own methods gleaned from trial and error, workshops with other artists, guide books, etc. I think I've really worked out a good system for you to use so walk with me as I proceed through the process of creating a realistic portrait from a photograph.

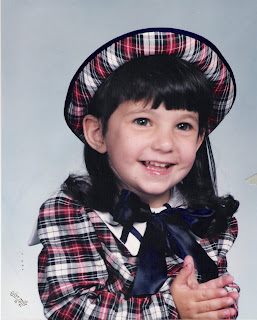
STEP 1. Choose a good clear photo. I've been approached many times to paint a portrait from some of the worst photographic shots and/or blurriest pictures imaginable. I've also been instructed to change the hairstyle, slim up the body, etc. For the most part, after years and years of painting portraits, I can just about please anyone who wants changes but if you are just starting out to create a portrait, I highly recommend that you get the biggest, clearest, and closest to the person photo that you can get. For a first try, usually those 8" X 10" school photos work pretty well. Though the lighting is not the best, you can still get a good handle on the details. If you can't get a good 8" X 10" you can always enlarge the picture on your computer but the more you have to enlarge, the grainier and blurrier (is that a word) the picture is going to get and then you're back to square one on clarity. Here's an example of an excellent photo to work from. Let's take this photo as our example and let me show you the step by step process.


Now, you've seen the photo, here's the finished piece on the easel on the day of completion. But how did it get to it's finished stage?
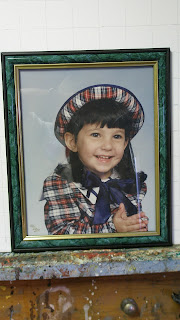
Still speaking from a photo choice step, I was given my photo in a frame as you see here.
.
Whenever you get a photo, you can tell from the commissioner's attitude how precious this photo is so the first thing I do is to scan the photo on my color copier. This way I have a color copy to hold in my paint covered hands as I work. Once I have the color copy I place the original photo and the color copy each, into a large zip lock baggie. This baggie protects the original picture from the messinest of my studio and I'm able to match colors or create a grid pattern on the plastic of the color copy. See the grid on this baggie? I'll tell you moe about that later.


That brings us to STEP 2. You've scanned the picture to get the color copy. As long as you are scanning go ahead and download a copy of the photo in your computer AND use the color copy or the scan to print a black and white copy. Why all this computer work? Tune in tomorrow to find out.